It’s your ‘umble scribe’s 60th birthday this week and to mark this occasion, Hilary and Andrew, my siblings conspired to take me away from Bristol for the weekend. When we were sorting out our late mother’s estate, we all expressed a wish for a sibling saunter in Staffordshire and this proved the ideal excuse.
Andrew and Hilary made the arrangements, whilst I researched walks and gave them 2 options – one involving a circular walk round the Head of Trent (the upper reaches of the Trent before it enters the city of Stoke on Trent. Ed.), the other a walk round the site of the Battle of Blore Heath, one of the first major battles of the Wars of the Roses, which was fought on 23rd September 1459.
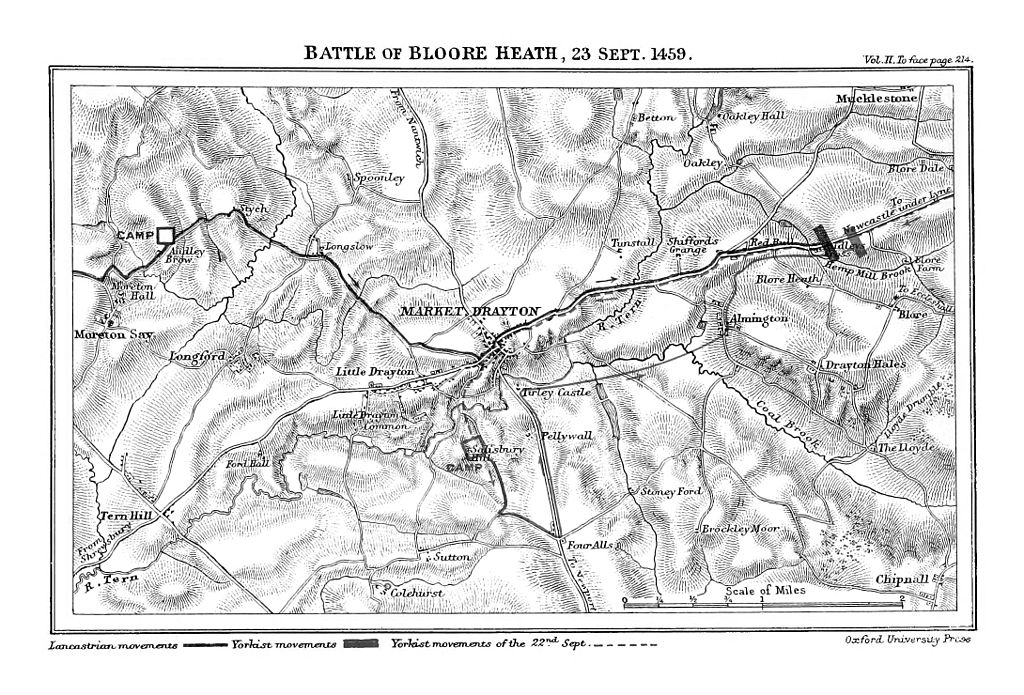
In the end the Blore Heath won and found the assembled siblings outside the Loggerheads Hotel in Loggerheads ready to start walking the excellent route provided by the Blore Heath website. The route comprises a circuit of the main battlefield down its eastern flank along what would have been the Lancastrian line, then down through the valley which saw the most fighting. There is then a walk through woodland and up towards the quiet village of Mucklestone, where it is said that Queen Margaret watched the battle unfold.
Battle of Blore Heath – a summary
The battle occurred when the Yorkist force based at Middleham Castle in Yorkshire (led by the Earl of Salisbury) needed to link up with the main Yorkist army at Ludlow Castle in Shropshire. As Salisbury marched south-west through the north Midlands, Queen Margaret ordered Lord Audley to intercept them.
Audley chose the barren heathland of Blore Heath to set up an ambush. On the morning of 23rd September 1459 (Saint Thecla’s day), a force of some 10,000 men took up a defensive position behind a ‘great hedge’ on the south-western edge of Blore Heath facing the direction of Newcastle-under-Lyme to the north-east, the direction from which Salisbury was approaching.
Yorkist scouts spotted Lancastrian banners over the top of the ‘great hedge’ and immediately warned Salisbury. As they emerged from the woodland, the Yorkist force of some 5,000 men realised that a much larger enemy force was awaiting their arrival. Salisbury, instead of disbanding or withdrawing his army, immediately arranged his troops into battle order, just out of range of the Lancastrian archers. To secure his right flank, he arranged the supply wagons in a defensive laager, a circular formation to provide cover to the men. Fearing a rout, Yorkist soldiers are reported to have kissed the ground beneath them, supposing that this would be the ground on which they would meet their deaths.
The two armies were separated by about 300 metres of barren heathland. A steep-sided, wide and fast-flowing brook – the Wemberton or Hemp Mill Brook – ran between them. The brook made Audley’s position seemingly impenetrable.
Initially, both leaders sought unsuccessfully to parley in an attempt to avoid bloodshed. In keeping with many late medieval battles, the conflict opened with an archery duel between the longbows of both armies. At Blore Heath this proved inconclusive due to the distance between the two sides.
Salisbury, aware that any attack across the brook would be suicidal, employed a ruse to encourage the enemy to attack him. He withdrew some of his middle order just far enough that the Lancastrians believed them to be retreating. The Lancastrians launched a cavalry charge. After they had committed themselves, Salisbury ordered his men to turn back and catch the Lancastrians as they attempted to cross the brook. It is possible that the order for this Lancastrian charge was not given by Audley but it had the effect of turning the balance in favour of Salisbury. The charge resulted in heavy casualties for the Lancastrians.
The Lancastrians withdrew, and then made a second assault, possibly attempting to rescue casualties. This second attack was more successful with many Lancastrians crossing the brook. This led to a period of intense fighting in which Audley himself was killed, possibly by Sir Roger Kynaston of Myddle and Hordley.
The death of Audley meant that Lancastrian command fell to the second-in-command, Lord Dudley, who ordered an attack on foot with some 4,000 men. As this attack also failed, some 500 Lancastrians joined the enemy and began attacking their own side. At this point, all remaining Lancastrian resistance collapsed and the Yorkists had only to advance to complete the rout.
The rout continued through the night, with the Yorkists pursuing the fleeing enemy for miles across the countryside. Salisbury employed a local friar to remain on Blore Heath throughout the night and to discharge a cannon periodically in order to deceive any Lancastrians nearby into believing that the fight was continuing.
At least 2,000 Lancastrians were killed, with the Yorkists losing nearly 1,000.
The walk
Starting from Loggerheads, we skirted the borders of Burnt Wood (called “Rounhay wood” at the time of the battle. Ed.). We were following the route that the Yorkist forces would have taken. This top end of the walk was quite boggy, so good waterproof boots are recommended. From this high point of the walk there are fantastic views across Shropshire to the mountains of North Wales, some forty miles away. The landmark of the Wrekin is clearly visible to the SW and is about 20 miles away, as is the tower of St Mary’s Church in Market Drayton, some 4 miles away.
We continued downhill to the hamlet of Blore, where we turned onto a a lane and then from the edge of the hamlet followed the line of the ‘great hedge’ behind which the Lancastrian banners were seen. The hedge has been much reduced in stature by the invention of the flail mower, but experts believe it has been in situ for 1,000 years. Halfway along the hedge is a large horse chestnut tree from which Audley’s Cross – marking the spot where Lord Audley was slain – can be seen. We stopped for lunch near the end of the ‘great hedge’ roughly at the end of the Yorkists’ left flank.

From the lunch stop we proceeded downhill across the fields downhill and around the southern edge of the battlefield towards Hemp Mill Brook and a crossing of both it and the A53, the latter being particularly dangerous due to its narrowness, bends and the speed of the traffic. At this point we deviated from the route and went up the A53 for a better view of Audley’s Cross (a cross has stood on that spot since the day of the battle. Ed.) before returning to the actual route of the walk.
Once over the A53 and back on the route, we followed a lane for a short while, then proceeded through Folly Wood to the outskirts of Mucklestone, entered the village and headed for the church.

It was from the top of the Mucklestone church tower that Queen Margaret is said to have stood and watched her forces defeated. She is then supposed to have made good her escape in the direction of Eccleshall by forcing William Skelhorn, the village blacksmith, to reverse her horse’s shoes, thus confusing any pursuit. The anvil in the churchyard, which was retrieved from the smithy when the latter was demolished, commemorates this legend. The anvil is sited next to the grave of another, much later member of the Skelhorn family.

From Mucklestone we proceeded up a rough track called Rock Lane to return to our starting point in Loggerheads.
After the battle the victorious Lord Salisbury, anxious to press on towards Ludlow and the main Yorkist forces, moved south, camping on a hill on the outskirts of Market Drayton ever since known as Salisbury Hill. When we were children, this was the main hill in the town for sledging when it snowed. This delight is now out of bounds to today’s Drayton children, as the hill has been absorbed into the land occupied by the local golf club and the stile we used for access is no longer in situ.
After a most satisfactory walk we all retired to Newcastle-under-Lyme for a night in a hotel, preceded by an excellent curry and a couple of beers in Audley.
I’d like to thank my siblings, Andrew and Hilary, for making it a memorable weekend and suggest we plan other Staffordshire Saunter sometime soon. 🙂
Fantastic Sibling Saunter. It was great to walk around the site of the battle. You can truly see how the battle went against the Lancastrians, despite their numbers and advantageous position initially. Interesting too, to note the shrewdness of Queen Margaret in making her escape in the manner she did.
The Battle of Blore Heath has been the subject of re-enactments in recent years – good to know that people are still interested in the past.
Hi Hilary
It was a wonderful day out for me thanks to you and Andrew.
I can’t wait till we do another walk.
Yesterday evening your photo of the anvil sparked some interesting discussion down my local: is the anvil really a 15th century artefact?
Furthermore, there was also a lot of speculation concerning the range of medieval longbow. The consensus was that about 300 metres – the approximate gap between the two sides at Blore Heath – was towards about the limit that an arrow could be fired.